Thursday, June 28, 2012

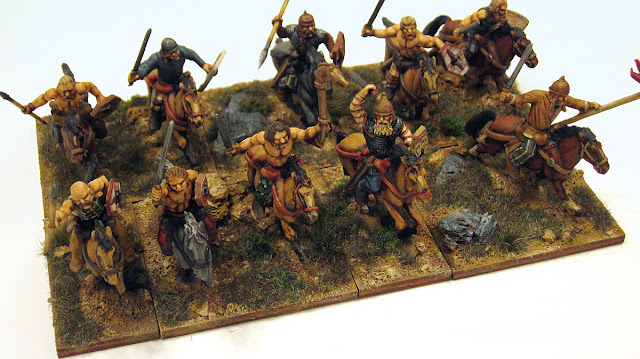
Warlord Games Celtic Cavalry


I finished up a box of Warlord Games Celtic Cavalry and posted a few pics and thoughts after the jump.

Warlord Games Celtic Cavalry Tips

The Warlord Games Cavalry box comes with 10 horses and riders. I wanted to use 12 figures in the unit, and rather than buying an entire extra box of cavalry I searched for a pair of cavalry I could add.  After looking at a number of possibilities I thought Crusader's German Cavalry (with a head swap) would fit.  I liked the horse sculpts in the Crusader figures and really like Crusader's figures. Sadly I discovered Warlord Games Celtic Cavalry and Crusader do NOT mix.  The Crusader horse is ginourmous compared to WG. Yikes!

Warlord Games and Crusader cavalry don't mix!

Reevaluating I decided to simply move forward with 10 figures. I like Hail Caesar and don't plan on playing and rules that require figure removal so the actual number of figures per unit isn't a matter of life and death.  Two of the 50mm x 50mm bases wound up with one (rather than two) mounted figures.  To  create more visual weight to the understaffed bases I added a bit of mulch bark painted up as a rock outcropping.


I also decided to avoid placing the horses nose to tail, offsetting them, tilting them and generally adding a sense of disorder to the figures. I know in reality it's likely all of the horses would fall in line (being herd animals), but I wanted to add a sense of chaos and fury to these Celt horsemen to match the wild and wooly foot troops they'd be fighting alongside.


Monday, June 25, 2012

Black Tree Designs Ancient Germans


I finally managed to polish off a number of projects that had been lingering on my workbench for months, the biggest of which were fleshing out a pair of ancient German warbands for Hail Caesar. Thanks to the Black Tree Designs big Summer sale I was able to pick up two dozen barbarians and sped through painting them to table standard. Despite the rush, I think they turned out well (more a credit to the sculpts than my paint job). More pics and thoughts after the jump.

I acquired a few Black Tree Designs figures in a lot of barbarians about a year ago. I used many of them for a stand of Celts, but mixed in with the lot were a handful of BTD ancient Germans, German savages, and Picts. Trying to scrape together some stands I combined them with some Foundry Germans into a hodge podge of "german barbarians".  With the BTD sale I was able to expand on my existing figures to create a single warband of naked savages and a single warband of clothed Germans.

BTD Picts on the left, German savages on the right

Review of Black Tree Designs Germans

Having a few Black Tree Designs on hand, I thought I knew what I'd be getting.  After getting a pack of German Savages, Chieftains and Warriors recently I found there were marked differences within the range.  The Chieftains were great: crisp detail, expressive, little flash.  The warriors were of the same quality, but I was surprised that they required drilling to open their hands to accept spears.  The savages I received all bore clubs, but I noticed a number had either weak detail or were miscast. Luckily all casting errors would be covered up by their shields but it was a bit surprising. 


Also, the Warriors had knobs or posts for mounting their shields jutting from their elbows.  Since these large tribal shields were held from a handle centered behind the boss, affixing them to the posts would have looked incorrect.  I simply removed the elbow posts and glued the shields to their fists properly.


Despite these drawbacks, I was still very happy with the figures. They mixed well with my existing forces and the sale price could not be beat. 


Black Tree Designs German Savages

Friday, June 22, 2012

Want a kubelwagan? Maybe Toyota can help.

Toyota released some photos of their new concept car, the Camatte.


The first thing I thought of when I saw it:


I must have too much WWII on the brain...

Thursday, June 21, 2012

Getting Started with WWII Eastern Front Wargaming


My World of Tanks addiction succeeded in pushing me to getting started with my Eastern Front project.  I binged on the first season of Greatest Tank Battles, picked up a few Perrin 10mm tanks to practice on as well as a pair of books about the battle for Kursk: FIFTH GUARDS TANK ARMY AT KURSK: 12 July 1943 (Visual Battle Guide) and Das Reich Division at Kursk: 12 July 1943 (Visual Battle Guide)


They are both a bit like super-sized Ospreys.  Although they focus on Kursk, there's some introductory material about the lead up to the battle, and tons of info on the actual regiments, their equipment and tactics involved in the battle.  I've only flipped through and read a few bits, but it's looks to be the type of nitty gritty wargamey minutia that most folks wouldn't care about ("how many reconnaissance motorcycles did the flakpanzer battalion have at Kursk?") but I really dig.


After asking on TMP I also got a number of other recommendations for books and films to check out to get a handle on everything from the Winter War to the fall of Berlin.

Eastern Front Book and Film Recommendations


Winter In Wartime


The Winter War (TALVISOTA)


The World at War [Blu-ray]


Barbarossa: The Russian-German Conflict, 1941-45


When Titans Clashed: How the Red Army Stopped Hitler (Modern War Studies)


Stalingrad: The Fateful Siege: 1942-1943


The Fall of Berlin 1945


Last Battle: The Classic History of the Battle for Berlin

Monday, June 18, 2012

Basing Romans for Hail Caesar

When I started with ancients in 28mm I wasn't sure which rules system I'd be using: DBA, Impetus or Hail Caesar.  To maintain flexibility I based my Romans in a combination of two 60mm and one 40mm wide bases. With that combination I thought I'd be able to flip between the different rules system easily.

DBA: one 60mm base = 1 DBA element.
Impetus: four 60mm bases = 1 Impetus unit
Hail Caesar: two 60mm bases + one 40mm base = 1 HC unit, with the option of adding a third 60mm base in the future.

Basing for Hail Caesar

After playing a few games of Hail Caesar though, I was sold and I decided to move ahead with HC as my rules of choice. I had been working on a Punic Wars era Roman army (despite starting with late republican figures), but hadn't anticipated the basing suggested in the Punic Wars army list that was released in the Biblical and Classical book. I know that the underlying ethos of HC is "do whatever you'd like", but as this is my first foray into the period I've decided to stick with their suggestions for the time being. The basing system for republican Romans is many small bases to model the checkerboard formations of the Romans during the Punic Wars. My 60+40+60 system didn't map very well to the 80mm wide small units I'd need to field, so I decided to switch to a mixture of 80mm and 40mm bases to more easily switch between normal and small sized units.


Until I can get some proper Polybian Romans painted these late Republican units will be subbing in as proxies, but with my revised basing they should fit in seamlessly with my hastati, princeps and triarii once I get them ready.

Checkerboard pattern of small units (80mm and 40mm+40mm bases)

Wednesday, June 13, 2012

Ancient German Shield Assembly Line


Shields seem to be my bane. I seem to spend more time on an individual shields than I do on the figure holding it. With about 20 more ancient germans to go to finish off a pair of understrength warbands I decided to attack their shields with a painting system to churn them out as quickly as possible. My system after the jump.

First step was priming the backs of all the shields brown. The shield faces got either a coat of brown or bone white primer. I gave the wood grain backs a quick drybrush of desert yellow and bone white, while the bone white faces received a quick highlight of white.


Next I laid out a grid of wall-tac putty, 4 columns wide and 6 rows deep. Keeping my earlier shield design file handy I chose one color for each column: red, blue, green and black.
Starting at the top of each column, I moved down each row painting a unique design on each shield with that column's chosen color. I found that using three colors per shield gave them a bit more visual interest so most shields got an accent color as well.
With a ton of minis to get painted up for a game later this month, I strived for a tabletop standard rather than showpieces. The last time I attempted hand painted shields they took my close to a week to finally get finished.  With this system, moving rapidly, and not stressing about the fiddly little details I was able to knock all two dozen shields out in a night. They could still use an ink wash to pop the center spine out and some weathering on their lower edge, but overall these are done.


Monday, June 11, 2012

Revisting World War Two

I was cleaning up my painting table and came across a "World of Tanks" promo card that was part of the goody bag from Historicon 2011.  I'd forgotten about World of Tanks , but after giving it a try I've become totally addicted.  World of Tanks is a free-to-play online World War II tank shooter.  Games are quick, controls are easy, and there's some fun had in "leveling up" your tanks to outfit with upgraded engines, weapons, and radios.  It's not historically accurate in the least - all makes, models and countries tanks appear on each team - but it is a heck of a lot of fun. Playing it also finally got something that's bugged me about WW2 wargaming to click.

My first historical wargame was Crossfire, a company level WWII set of rules.  I painted up a few platoons of Americans and Germans, built gobs of terrain and tanks and had quite a few fun games.  After a while though Crossfire failed to scratch my WWII itch and I moved on to ancients which I've been happily plugging away at for years now. Crossfire works beautifully with a few platoons of infantry per side, backed up with heavy machine guns, mortars and the occasional tank.  Tanks are rightly neutered in Crossfire to keep the focus on the low level infantry actions it models so well, but that's precisely what was bugging me about the rules. The big draw of World War 2 to me is the staggering variety of forces that each nation threw at each other. Certainly the common grunt was integral, but not since the 40's have such a broad collection of armored cars, motorcycles, cavalry, tanks, tank destroyers, artillery, planes, and field guns been involved in such  evenly matched fighting.  I think modeling that mind boggling array is really a key to my interest in wargaming the period, but Crossfire, Flames of War, IABSM and other squad / platoon / company level rules don't seem to be set up to handle a lot of hardware on the table.

With my interest in WWII rekindled by World of Tanks, I'm poking around the internet looking for a scale and rules set that might allow me to field dozens of tanks per side, without the table looking like a bumper car ride of panzers jostling each other cheek to cheek.  Currently I'm leaning towards 10/12mm using Blitzkrieg Commander, but doing some small skirmishes with another rules set in 28mm occasionally.  I've found a lite version of the Blitzkrieg Commander rules and I'm hoping to try them out with my older 20mm figures in the next month or so.  Flames of War also has a series of demo videos to teach the rules, which I might give a whirl if I can glean enough info from them to run a short game.

Friday, June 8, 2012

Podcasts for Gamers: Norman Centuries

After wrapping up Brownsworth's "12 Byzantine Rulers" I jumped into his "Norman Centuries" series, another set of podcasts that act as an abridged version of one of his books.  I had become familiar with the Normans while reading up on William the Conqueror, but having a soft spot for Harold I didn't follow up on their history post Conquest. I was really surprised by their arrival in Italy a few decades later and the numerous wars they got involved in as mercenaries and conquerors.  The rag tag collection of Normans, Italians, Greeks and Muslims squabbling over Italy and getting into open conflict with the Pope(!) was fascinating.

I really dig armies with diverse troop types and the Normans seem to touch everything from the end of the dark ages, to the Byzantine Emire to the beginning of the Crusades. I'm looking forward to reading up more on the Normans in Italy with an eye to getting some of these weird mixes of troops and ethnicities on the table. I'm already toying with the idea of a Norman SAGA warband, and fleshing it out into a full Norman army for Hail Caesar.

Also, it looks like he's allowed the podcast to be included in a straight up iPhone app from the iTunes store. If you wanted to purchase the podcasts instead of downloading them for free.

Monday, June 4, 2012

My Tips for Wargames Factory Romans


Wargames Factory's Romans were one of the first historical miniatures plastic kits to hit the market. Although their tooling is fairly basic compared to some of the really fine sets that are being released currently, they are still an affordable way of building up a Roman army quickly.  Until Warlord Games and Victrix release their early and late Republican Roman sets, Wargames Factory's seems to be the cheapest method of getting mail armored legionnaires on the table.

I've built a few boxes over the last year, and found Scott McPhee's tips invaluable before starting on my own. I won't reiterate his great advice, but I've posted a few items of my own I think I can offer after the jump.


Wargames Factory Shields Tips

I confess. Despite the great visual impact shields make once finished, I find making them rather tedious. Here's the system I employed to get them done as quickly as possible.

The plastic shields in the kit weigh very little. To keep them from being blown around by spray primer, and save time by not taping or affixing them to putty I simply snipped one of the sprue supports and then bent the shield up on the remaining sprue support. Attached to the frame, the shields didn't blow around when primed, and by tilting them up I was able to spray the upper shield rim where the first support was trimmed off. Once dry, I snipped them off the remaining support, and trimmed the rim.  That unprimed rim would become the bottom of the shield, where the naked plastic wouldn't be seen.


For the decals I used a combination of knife and scissors.  I started by making straight incisions to remove the decal and backing from the central portion of the decal through which the shield boss needs to protrude.


Finally I cut each decal out with a pair of tiny scissors that came in a fingernail care kit. Their tiny size and slightly curved blades made trimming the decals out a snap.


Finally I affixed each decal to a shield, taking care that the weathered portion of the shield was on the same side as the unprimed lower rim.


Building Wargames Factory Romans Tips

Scott McPhee described the challenges he had getting these legionnaires to rank up. I wanted to avoid similar issues, so I took care during assembly to make sure they'd be able to form ranks easily.  The arms holding weapons (pilum or swords) will encroach into the space of of other ranks, but I didn't have any problems getting an offending pila or elbow to squeeze into the area between two figures in another rank.  The worst offender is the shield held in the offhand, which can't easily be squeezed between the figures of another rank.  To ensure the figures can rank up, I made sure to rotate the offhand as low as possible. By keeping the shield hand close to the figure's waist, the shield takes up as little space in front of the figure as possible.

The figures don't hold the shield out in front of them, but keep it low, nearly touching the base.

Keeping the shield low also allows the "cocked back" sword arm able to position the blade just above the rim of the shield, ready to deliver a blow to an enemy's face. Much better than having the blade pointed at the back of the shield.

Wargames Factory Romans rank up if shield arms are rotated properly.

During assembly I was sure make a few adjustments to the body of each figure as well.  Each arm socket received a few crosshatch incisions from my hobby knife to give a little more surface area for the glue to latch on to.  Also, I made sure that any figure that was armed with a sword had the hilt in his scabbard snipped off, since that sword is being held by the same figure.


And that's it!  I enjoyed building these figures, and despite the shallow detail on some of the bits even with a table standard paint job I think they look nice once ranked up and based.