Showing posts with label Terrain. Show all posts

Thursday, November 8, 2012

Desert Wasteland Wargame Terrain Cloth Tutorial


I've been upgrading my terrain scenics lately: woods, buildings, walls and other items that sit on top of the table, but I've been holding out on updating the terrain board or cloth that our miniature wargames are played on. I toyed with the idea of creating terrain boards, but after seeing some impressive terrain cloth tutorials (Of Metal Men's, Jeff Knudsen's Terrain Cloth and Balagan's Felt Cloth for example), I decided to tackle one myself as part of my Flocktober projects. Hurricane Sandy and Fall-In delayed completion, but pics and a tutorial after the jump.


I was wary of jumping right into a costly "rolling farmland" flocked terrain cloth without a little experience under my belt. I have some sci fi games I wanted to dust off and figured I could use a desert wasteland terrain cloth for them. Plus, sand is cheaper than grass flock.

Materials

I used the paint shades suggested in Quindia Studios awesome desert terrain board tutorial, namely Scorched Brown, Bestial Brown, Bleached Bone and gray. As described in the Quindia Studios article I brought in paint samples to the local DIY store which they matched then and provided water based acrylics in "sample" pints. Very easy and very cheap.
 
I also picked up a 5'x5' canvas dropcloth and some bathtub calk in various shades of brown, tan and cream. I had to resupply during this project, so here's a full list of the materials I ended up using:
  • 1 canvas drop cloth ($7)
  • 5 pints of paint ($2.50 each)
  • 4 tubes of calk ($6 each)
  • 1/3 bag of sand
  • calk gun, wide paint brushes, palette knife, mixing tray and gray paint I had on hand.

Initial Terrain Cloth Sand Base

I spread the cloth on my work table and got to the business of spreading the tan calk and smearing it into a thin layer with a palette knife (I later switched to using my finger for tricky spots which seemed to work better).


I sprinkled the wet calk with sand and then used one of the other calk tubes as a rolling pin to smooth out the sand and make sure it had a firm bond with the calk.


After the entire table was covered in sand and calk, I waited for it to dry overnight before removing all excess sand.
Completed sand layer

Painting the Terrain Cloth


Next I used a heavy layer of scorched earth and bubonic brown as the base paint, mixing and blending colored patches to give the terrain cloth a natural variation. At one point I was running low on paint and began using a diluted solution of paint and water as a "wash", which looked great even when dry, but wound up not providing the extra fixing strength that a proper coat of paint did. I wound up going back and giving a few coats of paint to the entire cloth to ensure full coverage and to get into tricky area.
Base coat of scorched earth and bubonic brown.

I tried a number of different calk colors, including a lighter tan calk to match the light sand color I had in mind for the table, but this ended up being a poor choice. I thought a dark brown would look too "wet" for an arid cloth if it showed up where the sand had worn off, but the light tan calk I chose really draws the eye when it peeks through crevices in the sand. If I did this again I'd stick with a dark brown calk for the entire mat.

Drybrushing

After allowing the base to color to dry and went back and drybrushed with various shades of bubonic brown, gray and bleached bone.
Beginning the gray drybrush on the left side.

Completed drybrush
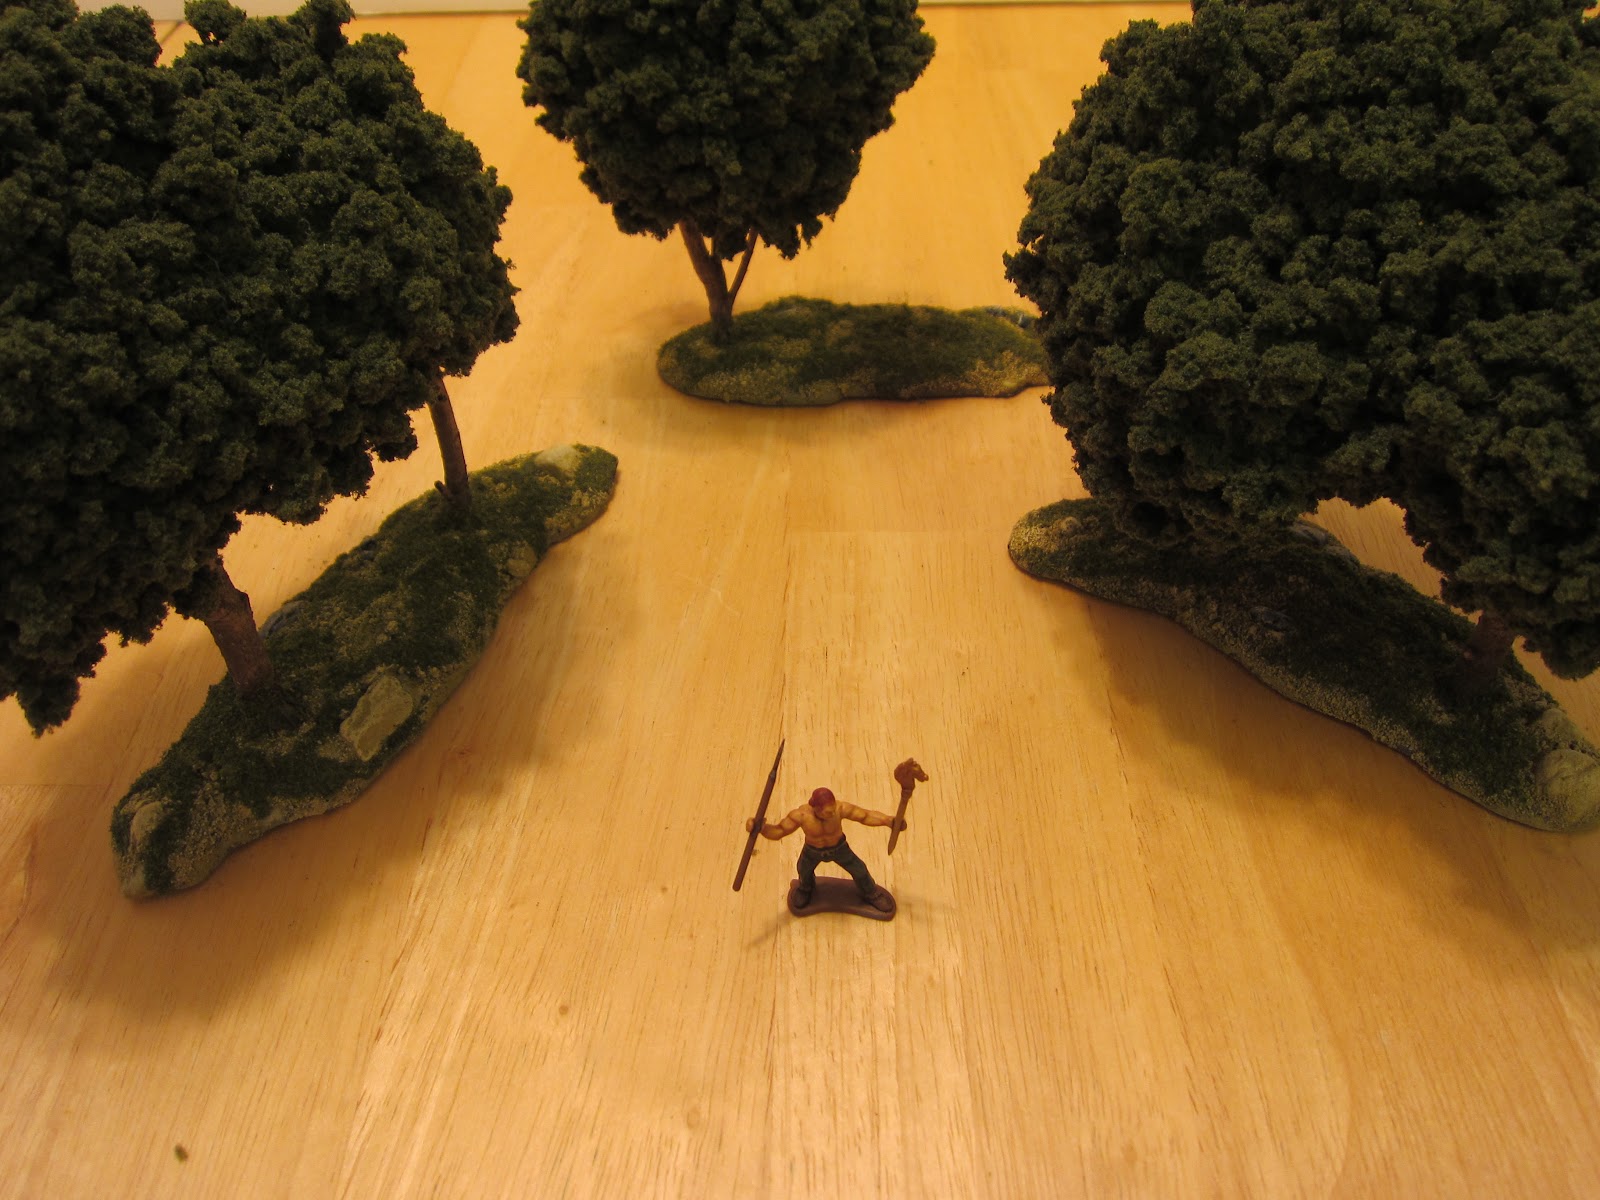
Overhead view with a few test pieces to show scale.

I'm happy with the final terrain cloth and looking forward to getting some games played on it. Placing foam hills beneath the cloth allows it to fold and bend into realistic hill contours. We already put it to use with our Halloween game just before it was completed and it worked really well. One word of warning, the amount of sand and calk on this table makes it heavier than I expected. I fear a larger 9x5 cloth is going to be a pain to move by one person if it uses the same sand and calk method as described above.

There are a few other additional terrain pieces I'd like to make to match this terrain cloth such as the rock formations in these tutorials: Chicago Wargamers Rock Formations and Baueda's  Desert Terrain tutorial

Sunday, October 7, 2012

Flocktober! Improving Wargame Trees Tutorial


After figuring out how to improve my wargame trees last year, I didn't employ those techniques to bring the rest of my wargame trees up to par. To kick off Flocktober I decided to try using those same methods to improve some rather wimpy Woodland Scenics trees and document the process in case anyone else is interested. All my tips for building wargame trees after the jump.

Materials Needed for Building Wargame Trees


The most important thing you should keep in mind is that this project has a wide margin of error. I'm going to give you my tips but you have a lot of leeway in the actual materials you use if you are following along.


  • Tree Armature: In this tutorial I'm using Woodland Scenics tree armatures I had sitting around that were looking a little sparse, but I've used twigs and branches from the shrubs out back. All you need is a twisty trunk like structure.
  • Tree Base: The trees are based on metal washers, but you could use wooden craft disks, plaster,  MDF, plastic card, anything rigid that won't warp.
  • Filter Material: I don't really know what this stuff is. I picked it up at a pet store and I believe its used in fish tank filters. You can see the package I used above, but really any sort of lacy, foamy, light weight stuff would work, as long as you can "tease" it apart and paint it.
  • Spray Paint: I used a cheap camo green from the hardware store. 
  • Hot Glue Gun and Glue Sticks: Now this you should probably try and use. White glue and super glue didn't work too well when I tried using them, so pick up a cheapy hot glue gun from a craft store.
  • Clump Foilage: I used  Woodland Scenics Clump-Foliage  but I suspect there are other brands that would work just as well. I like the Light and Medium green shades.
  • Scenic Cement: This is an optional item, but it should make the trees a little more resiliant. If you pick up  Scenic Cement  you'll need a spray bottle too available from craft and garden centers.

Creating the Wargame Trees

You need your tree armature affixed to its base and painted if necessary. I'm using an existing Woodland Scenics tree that looks a little anemic, so I won't be going into detail about building the tree armature.
The patient, looking a little thin around the branches
If your filter material is an unnatural shade (mine was blue for example), your first step is pull off a few chunks and spray it an earth or leaf color. Once dry, pull and tease a chunk of filter material apart to make a lacy net.  You want this material to be as 3-dimensional as possible, but don't sweat it. Even after teasing mine was still pretty flat.

Filter material sprayed camo green
Teased apart into a lacy net.

The filter material will bulk up the foliage area of the tree. Place it between the branches of your armature.  I tried hot gluing it to the armature, but found the filter material naturally clung to the pokey bits of the tree and glue turned out to be unnecessary. If your tree lacks an armature, you may want to use large amounts of unteased filter material to bulk up the tree.
Filter material worked into branches. Existing clump foliage peeks through gaps.
Now you simply need to spread a little hot glue on a section of the filter material and press some clump foliage on.  Work a little bit at a time so the glue doesn't cool and dry before you have a chance to affix the clump foliage. When you pull the glue gun away it will trail a thin strand of glue. Keep that strand under control or your tree will end up looking like a family of giant spiders lives in it!

Now just stick some leaves on. Watch your fingers, that stuff is hot!
Once all of the filter material is covered, give the whole tree a gentle squeeze to make sure the clump foliage is packed in and then spray it down with some scenic cement.

Before and after
 For real, this whole process is very easy and pretty quick. You may lose a few bits of foam here and there once they hit the table top a few times, but that's easily remedied with a little glue and replacement foam. 

Tuesday, July 3, 2012

Making Rough Ground Wargames Terrain Tutorial


One of the main reasons I've been so taken with this hobby is the visual aspect of miniature games.  The actual figures don't take up very much room on the tabletop battlefield and I think the terrain that makes up the battlefield should receive just as much attention as our figures. I'm on a continuing mission to create better looking terrain for my wargames and I've documented my process for creating some rough terrain in case you'd like to try something similar.  Follow along after the jump.


Materials for Rough Ground Wargames Terrain


First collect your raw materials. Luckily, the ingredients for this project are very inexpensive. You'll need:
  1. Dry mulch or bark from a home improvement store. (I got a lifetime supply for 3 bucks)
  2. Wooden craft disks (for small terrain markers) 
  3. MDF (for larger rough terrain fields)
  4. Craft plaster
  5. Paint (I took samples of Scorched Brown, Bestial Brown, Desert Yellow and Bone White to the home improvement store. They matched the samples and created custom pints of acrylic paint for about the same cost as a bottle of GW or Vallejo paint)
  6. Sand (a bag of play sand available from your home improvement store will last forever)
  7. Flock, static grass (you probably already have this on hand if you base miniatures)
  8. PVA white glue
  9. A 3 year old boy (optional)


Creating Rough Ground Bases

  1. If you decide to make a larger terrain piece, cut your MDF into a base with natural curves. Mine has a vaguely dog bone-kidney bean shape, but anything that doesn't have a regular oval or rectangular shape should work
  2. Glue bits of the mulch bark to the craft disk and MDF bases.
Using optional 3 year old applicator


Applying Plaster to the Rough Ground Terrain

  1. After the white glue has dried, mix up a batch of the craft plaster and apply liberally to each of the bases.
  2. It's ok if some of the plaster oozes off the side of the disk as the natural border it creates will disguise the man made nature of the wooden disk.
  3. Be sure to leave a portion of the mulch bark peeking above the plaster.


Adding Sand Texture to the Rough Ground Terrain

  1. Once the plaster is fully dry (it may take a few days), fill a tub or bag with a liberal amount of sand.
  2. Coat the plaster portions of each terrain piece with white glue and press it into the sand.
  3. Remove, shake excess sand back into the tub and set aside to dry.
So easy a baby could do it!


Painting the Rough Ground Terrain

  1. Wait a day or two for the white glue to fully dry, brushing off any loose sand.
  2. Begin painting each terrain piece. Scorched Brown as the base, followed by a drybrush of Bestial Brown, Desert Yellow and finally Bone White. For the mulch bark that represents larger boulders or outcroppings rising from the earth, give it a coat of dark gray followed by a drybrush if light gray and a final very light drybrush of white.
After applying Scorched Brown, Bestial Brown, Desert Yellow and Bone White
After picking out the rock outcroppings in gray and white.


Adding Foliage to the Rough Ground Terrain

  1. If you are creating rough terrain for a desert or arid region you can probably wrap it up now. Otherwise apply white glue to the edge of each terrain piece as well as in sporatic patches across the surface of the terrain (avoiding placing glue on the gray outcroppings)
  2. I applied a vibrant green flock and static grass to the edges of the terrain pieces that matched my ground cloth. Across the surface of the rough ground I applied a mix of static grass, clump foliage and a few grass tufts.

And that's it! Super easy, super cheap and kids can help. I'm happy with the end result and looking forward to creating more terrain soon.


Tuesday, June 7, 2011

Megawood


Finished up my "megawood", a huge stand of dense trees to fill a large portion of the table.  I based the design on a combination of techniques from Architects of War and other tutorials for similar woods with removable canopies.
A few years ago when I was playing more Company level WWII stuff, we played a lot of battles in pretty dense terrain. Trees and woods were a quick and easy solution for generating a lot of cover, but I was never happy with the look of individual trees making up the bulk of our woods.  I wanted a few "megawoods" with actual canopies to form the center of these large forests, with the smaller individual trees making up the less dense border areas of the woods.  I'm hoping these woods will be just as useful for my hordes of Celts and Germanic tribes to lurk within.


The canopy lifts off to allow placement of figures within the woods.


Together with my other wood bases I should be able to create fairly dense forests.
Hoping to get one more megawood finished as well as a number of the smaller tree bases.

Sunday, June 5, 2011

Improving My Miniature Terrain Trees

Woodland Scenics tree on the left, my custom trees on the right.

I had an epiphany a few years ago. For all the time we spend painting, detailing and basing our miniatures, most of a wargame's playing surface is covered by terrain rather than figures.  I think it's a shame to see beautiful figures battling it out on top of some ratty green felt and half a dozen crummy model railroad trees.

I really get jazzed about beautiful set ups - wargames that look like dioramas with terrain that matches the figures in aesthetics. My first order of business when I got back into wargaming was to upgrade my terrain. I found out that I may have had some figure painting skills built up over decades, but when it came to terrain I was clumsy novice.


Here's what I started with. I have several dozen Woodland Scenics trees based on washers.  Pretty weak sauce.


My first stab at improving the look of my woods was to add some additional foliage to the base.

That's a mix of lichen, clump foliage and flock. The effect was better, but I felt the lone tree was still lacking. What I needed was a base of several trees and foliage to add additional visual "weight" to the woods. I made some test pieces, trying out different combinations of plaster bases, base colors, flocking, commercial and natural stick tree armatures. The results weren't too impressive, but I was learning a lot.


I studied a lot of my favorite layouts like those featured on Joe Dever's site , some of the really great demonstration games at the various wargame shows as well as tables featured in Wargames Illustrated. I finally struck on a combination of natural wood armatures, plaster basing and flock that I was happy with.


I finally settled on tree bases that provide large, heavy trees, but dispensed with the "wall of foliage" I had experimented with to avoid making every tree look like an overgrown bush. Comparing this new solution to my previous trees, I was pretty happy with how much space the new pieces took up. Those are some meaty trees.!


The Woodland Scenics trees don't have a very large footrprint on the games table. Pretty sickly looking saplings!


I think the new trees create the impression of a woodland with only a few pieces.
UPDATE: I've posted a brief tutorial on bulking up trees that uses a technique very similar to the one I employed to make these improved trees.