Sunday, April 28, 2013

Kickstarter Roundup: Dungeons and Hussars


There a pair of Kickstarters I'm following, one just wrapping up and one just getting started: Dwarven Forge's "Game Tiles" and Wargamer's "By Fire and Sword".  More details after the jump.

Dwarven Forge

I've drooled over Dwarven Forge's resin dungeon terrain for years, but the incredible cost has always kept them out of reach. When Dwarven Forge announced their Kickstarter with much more affordable sets, I jumped in without hesitation. I have a huge number of Reaper Bones fantasy figures on the way, I've had a good time with Song of Blades and Heroes, and I've ping ponged between historical and fantasy gaming for the last 10 years. I know I'll get a chance to put these to use.

The Kickstarter is down to the final hours, but check out the free stretch goal addons they are throwing in when you order two sets or more:


I'm splitting multiple sets with friends plus adding some additional packs for enough tiles to cover a good sized gaming table. Something like this:


There also a number of excellent painting videos showing how easy it is to drybrush these tiles yourself. The Dwarven Forge "Game Tiles" Kickstarter ends April 30.

By Fire and Sword

I know nothing about 16th century Polish warfare, but I'm being tempted solely by the gorgeous rule book produced by Wargamer for their "By Fire and Sword" rules.


It appears to be quite a tome, and there are already fully armies for the factions included in the rules. Unlike most Kickstarters the product is already ready to be shipped, and Wargamer is using the funds to ramp up the English translation of the rules that have been in Polish for a number of years.

The English rules were released at Salute (I'm hoping to find a review of them soon), and it appears they are geared for both small skirmishes and large set piece battles.


The figures are in 15mm, which is a bit off putting (I have some 15mm Eastern Front WWII terrain that might be able to pull double duty, but 15mm isn't a scale I am heavily invested in), and I already have enough projects I'm juggling, and I 16th century Eastern European warfare is going to be a tough sell for my game group, but I'm thinking of getting the rules just to read and compare to other sets. I stil have time to decide as the "Fire and Sword" Kickstarter ends May 20.


Saturday, April 27, 2013

Converting and Painting Reaper Bones


Although mine haven't arrived yet, the Reaper Bones Kickstarter shipments are wending their way across the world into eager hands, some of which have never picked up a paintbrush before. I had another Bones figure on hand to do some converting tests upon, and figured it might be helpful to go through my painting process to offer advice to folks who now have several hundred figures to paint up. Don't worry  new painters! It's not all that hard, it just takes some patience and practice. My tips after the jump.

Tools: Hobby Paints


Getting started on your Bones minis might seem a bit daunting. Paints? Brushes? What to pick? For paint, I prefer Vallejo paints. They come in small dropper bottles, so you can dispense just a single drop of paint if necessary, and they are remarkably smooth and "thin". There are a number of basic sets to get you up and running (for example Vallejo Orcs and Goblins Paint Set, Vallejo High Elves Paint Set, Vallejo Medieval Colors Paint Set ) or you can purchase them individually. I've found that I have more shades of brown than any other color (ranging from deep chocolate browns to khaki and ivory, with a diversions into greenish gray or warm orange red browns) because they are useful for all manner of belts, shoes, scabbards, hair, furs, skin tones, etc.

Games Workshop paints are also popular, but I found the flip top lids lead to the paints drying out after a year or two in some cases. Still, they seem to be lingua franca amongst figure painters, so it's easy to match colors when someone mentions a shade they used.

There are a number of other brands of modeling paints (Reaper, Army Painter, Coat D' Arms, just to mention a few) all of which are fine products. You should get them.

Tools: Craft Paints


Modeling paints can get pricey though, so if you are just starting out don't feel bad about picking up some craft paints. A number of figure painters use craft paints exclusively, and produce very good results with them. They are cheaper, more readily available, and come in just as many shades as hobby paints. Color matching is a bit trickier, and I've found they are thicker and require a bit of water to thin them out before applying. I freely mix both types of paints depending on the effect I'm trying to achieve.

Tool: Paintbrushes

I go through paint brushes frequently. I've tried to go cheap on brushes, and I don't think it's worth it. Steer well clear of "watercolor" brushes (the bristles are too limp to control easily), avoid synthetic brushes if possible. I try to find some natural sable hair brushes. I picked up some Army Painter brushes and have been very pleased with them.

Tools: Spray Paints

Reaper Bones don't require any spray primer, but if you branch out into figures of any other material (metal, plastic, etc.) you'll need a can of spray primer to give some tooth to the figure for the hobby paints to grip. Regardless you'll want a can of matte spray to apply after finishing a figure. The matte spray cuts down on the shine from certain paints and washes, and applies a protective coat to help prevent chipping or flaking to figures that will be handled by greasy pizza fingers on the table.

I use Army Painter Leather Brown Spray Primer for most of my priming, although I'll use a black primer or white for certain effects.  I typically use Testor's Dull Cote for my final overspray of finished models since I can pick it up at local craft and hobby shops.

Converting Reaper Bones


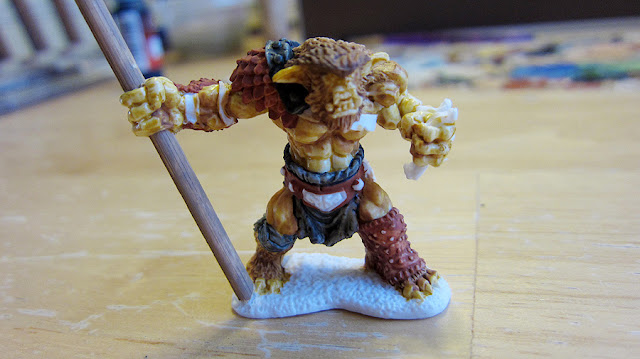
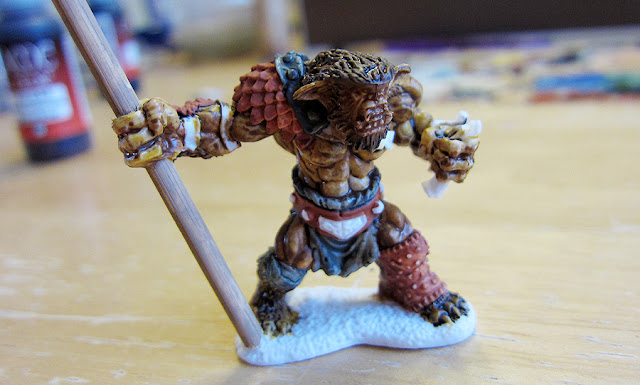
I was happy with my initial tests of painting a Bones figure. For my next test I wanted to see if they could be converted. For this bugbear I wanted to swap out its mornigstar for a spear, remove the spikes from its shield (which were a little over the top for me) and repose the shield arm so it was providing protection to the creature.


First I chopped off the morningstar and shield spike with a hobby kniffe. I also removed the shield to reposition later too. The Bones material is supposed to respond to heat, so I held the figure in boiling water for 45 seconds, bent the shield arm closer to the figure's chest and then held it in ice water for 45 seconds.


I drilled out the bugbear's weapon hand and used a wooden kebab skewer for the spear.


Painting Reaper Bones Bugbear


I usually start by "blocking in" the figure by giving each surface a solid color. I hadn't quite worked out the color scheme for the bugbear, so went about it bit differently this time. I started off blocking in the exposed skin and fur.


Skin blocked in with Vallejo Game Color Plague Brown. The Vallejo paint was a bit thin, but I was pleased with how it took to the Bones material. It almost acted like a wash, seeping into the cracks and crevices of the sculpt, and leaving a tint to the raised areas, naturally shading the figure. I picked up the technique of painting "inside out" from other mini painters. Start with the flesh, then work out (clothing next, followed by boots, belts, straps and packs that are on top of the clothing)


Adding Vallejo Game Color Beasty Brown to the darker fur areas on its head and back. To smooth the transition from the brown fur to lighter skin, I dipped my brush in water, the dipped it in a drop of the paint and applied it to the border between the fur and skin. The thin paint tinted the lighter yellow skin and created a smoother transition between the two.


Mostly blocked in. I chose a warm yellow and brown for the bugbear, and used Vallejo Red Leather and a dark green (a mix of Vallejo Black and light green craft paint) for the various leather armors and cloth items. I wanted the creature's fur and skin to be quite a bit darker than what you see here. The more colorful reds and greens should add some visual interest to the creature, but you can see I've left some of the straps unpainted at this point. I wasn't sure how dark the eventual skin and fur were going to turn out, and I wanted to be sure the straps placed over its skin would contrast.


Next up I added a dark wash. I usually use Games Workshop washes, but I didn't have any in the deep brown shade I was looking for, so I created my own. I put down two drops of Vallejo Game Color Charred Brown on my palette and loaded my paint brush with water. Mixing the two gave a very thin deep brown paint. Brushing it over the brown fur, it worked its way into the deep crevices and tinted the highlights.


I washed all of the exposed skin and fur of the bugbear. Notice how it picked out the details of the creature's face, defined the fingers and toes, etc.


Now that the fur and skin were closer to their final color I picked a light gray for the straps to contrast with the deeper skin color, and finished blocking in the rest of the colors. With a similar wash to the other straps, belts, cloth, and armor, this figure could be considered table ready. I went on to add a few highlights and pick out some details though to finish it off.


The scaled shoulder armor was blocked in with red leather (made from dragon scales maybe?). To highlight them I mix a drop of the Red Leather and a drop of light yellow craft paint. I painted the bottom half of each scale with this lighter shade. Next, I added another drop or two of light yellow to the mix and painted just the edge of each scale. It's a bit fiddly. I used my small detail brush, and hold my breath while I paint the scales. The goal is to get a suggestion of color on each scale, so that at a foot or two of distance the scales "pop".


For metal studs, I painted each black and placed a dot of Vallejo Oily Silver on each one. Teeth were picked out in Vallejo Bone White, tongue in Red Leather, and raised surfaces of the skin (knuckles, the edges of his pecs, thigh muscles, etc.) were given a dab of Vallejo Plague Brown. I wasn't happy with the original shield, so I used the boiling water method to flatten it, then reglued it with super glue into a more traditional position.

I left the base unfinished as I'm planning on creating a unit of these creatures for some mass fantasy battles in the future and will base them all together, but that's a post for another day.


One of the big revelations to me in painting this bugbear up is how well it takes thin paints. The white color of the Bones material allows you to gradually build up colors by applying multiple layers of thinner color. Also, the details on Bones are good, but comparing them to metal versions I think they are a little shallower. I'd be very careful in applying thick paint as it is likely to settle into crevices and obscure detail more easily. Good luck with your own painting! Patience and practice is all it takes :)

Tuesday, April 23, 2013

Incredible terrain set ups for fantasy campaign

I saw this link pop up on reddit and finally got around to watching it. This guy has filled his basement with elaborate terrain set ups for his groups rpg games. Even if you don't play role playing games you should check out these diorama terrain set ups. Awesome stuff!


Saturday, April 20, 2013

Lousy Roman Cavalry

Checking my lead pile I found a baggie of loose Roman cavalry I picked up off of eBay or TMP a few years ago.  My Romans are starting to get outnumbered by Carthaginians and Gauls so I figured it was high time to give the legions s a few reinforcements.

I spent last evening prepping and cleaning them, looking forward to getting to the actual painting over the coming week. I tackled the horses first and was surprised at the amount of flash they had, and some of the poor sculpting on them.

Horses


First take a look at these horses. I know horses are difficult to sculpt, but these are really quite terrible.
These look more like mules to me rather than powerful steeds.

And look how narrow! 
The horse bases were also warped and took a lot of bending just to make them stand up at all. The riders were just as bad. Check them out after the jump.


Riders

The proportions on these figures are way off, the poses are strange, and they are full of flash and miscastings.
What is this guy doing with his left arm? His hand is cupped near his face... a hand that should be holding a shield.

This guy could scratch his ankle without beding over.

I'm sure the enormous paddle hand is distracting, but be sure not to miss the amputated right foot.
I found several figures identically miscast. 
Frustrated with the poor quality of these figures I gave up trying to fix and clean them but I'm not quite sure what to do with them. Perhaps I can turn them into casualty figures, but they really deserve to be melted down and recast as something better.

One peculiar thing about these figures: the hands holding weapons would need to be drilled out to accept spears. Does anyone know who produced these figures? I'd like to steer clear of the manufacturer in the future.

Tuesday, April 16, 2013

Hail Caesar Skirmish #9: Won By the Razor's Edge


With my Carthaginians, Spanish and new leaders painted up it was time to get them on the table and see how they'd do. With Historicon fast approaching and another friend of mine joining us at the convention this year, I wanted to give him an intro to the rules in case we were able to get into a game together. A long time 40K and fantasy player, this would be one of his first exposures to historical wargaming. All the bloody details on a very close game after the jump.

Preparations

I modified a few of the unit cards available from Inevitable Spark
to help explain the game to our newbie. They worked great!

With both Libyan spearmen and Spanish scutarii on the table we used the Carthaginian list rather than the Gallic or Early German from our previous battles. I'm slowly inching towards a pair of opposing Punic forces, but for today's match up Hannibal's warriors would be facing the legions of the Late Roman  Republic. Non-historical, I know.

The Carthaginians were split into two divisions. I took the right, with the Libyan spearmen holding the center, supported by the Spanish scutarii. A band of celt slingers screened them, ready to fall back behind friendly lines once battle was met. A single celt warband lay in reserve behind some trees on our  extreme right.

The left Carthaginian division was being run by our newbie, M.C. His three celt warbands formed our main battle line, with his medium celt cavalry on the left flank in reserve. Our plan was to hit heavy on the left, while defending our right flank.

My usual opponent Mike took the Romans, but with the battle tipped in favor of the Carthaginians due to the addition of several new units he fell into a defensive position. His six legions formed up in testudo, four of them on a pair of hills on his left and right. He held his center with the infamous Cretan archers, who have yet to last more than a turn on the battlefield. His small group of Numidian cavalry held his right flank, facing off against the celt cavalry across the field.


The Battle Begins

The Carthaginians began by moving cautiously forward. The most efficient manner of doing this would have been for the army commander to give an order to both divisions, but we refrained from doing so to  allow M.C a chance to get some experience with issuing orders and rolling command dice. The celts surged forward, but my right flank lagged slightly behind.

Libyans and Spanish fall behind as the celts on the left flank surge forward.
Most frustratingly, the celt cavalry misunderstood their commands (no doubt hailing from some distant tribe who had trouble understanding Hannibal's orders) and failed to move for three turns.

"You think we're supposed to go with them?" "Naw, little fella said "Move yer ass", but we ride horse, not donkey."

The celt slingers exchanged missile fire with the opposing Cretan archers, but found the Roman testudo formation impervious to their attacks (the Romans normally receive a 4+ armor save on a d6. While in testudo they receive an additional +2 bonus to morale saves vs. missile fire, meaning they shrugged off any hits as long as they didn't roll a 1!)


  Noticing my slingers inflict a -1 penalty to morale saves at close range (less than 6"), I decided to be a bit more aggressive. Our battle lines were approaching (the celts were now just outside of javelin range on our left. I moved the slingers up into short range to threaten the Romans, despite their cowardly turtle formation. Finally striking a blow to one of the Roman units, and having suffered a number of poor rolls in missile fire, our Roman opponent was beginning to look a bit worried. So confident were we that M.C. and I agreed to redeploy the warband from my reserve to bolster his charge on our left. Mike, realizing we'd be hammering his right flank, decided he'd need to strike now to avoid the Carthaginians picking him apart at our leisure.

Slingers move up to deliver short range bullets to those stubborn Roman noggins.
One more shove and those Numidians
would be off the table.

The Roman Panic


Finally our celt cavalry finished sacrificing their goat, and seeing good omens in its entrails, decided to join the battle. They raced along the riverbank having rolled a triple move. In response, the Numidian cavalry countercharged. The horses met in a bloody clash, the Numidians thrown back to the rear edge of the battlefield with the celts following to maintain contact.

The celt warbands struck, but the Romans pulled out a crafty rule we hadn't used yet. Those Romans defending the hilltop used "Close Ranks" to gain a +1 to morale saves at the penalty of -1 to attacks. One Roman unit without a hill to defend countercharged his attackers. The battle lines clashed, with the barbarian hordes rolling 9 dice vs the Roman 7. The goat omens were indeed good for the celts, as very poor dice rolls continued to plague the legions. Though they hung on, the Roman right was severely bloodied, with a unit of cavalry behind their lines ready to finish off the Numidians and preparing to hit the Romans in the rear.

"Hold on fellas! We're almost there!" The celt reserve rushes to support the clashing lines.

Desperate, Mike threw his remaining Romans into battle. With the reserve warband still making its way towards the battle on the left flank, the Romans were able to scare the celt slingers back behind the Libyan line and wrap a single unit around the flank of the Spanish.


"Guys, I think this is over," Mike observed. "Can I just concede? These frickin' dice!"

M.C. and I have a long history of losing to Mike across many, many games. "Quit  yer whining," M.C. suggested, "We're going to beat you now."

From the Jaws of Victory...


The Romans had one round left. They attacked wherever they were engaged. They lost a unit in battle with the Libyans, but the Numidian horse held on, and in the great bloodbath on the left flank their luck turned. The celts, having spent their energy in the initial clash were now rolling 6 dice against the Roman 7.  The Romans lost one unit, but eked out a 1 or 2 point margins of victory in the other clashes, forcing break tests for those celt units. The celt gods showed their displeasure, the 2d6 break tests turning up snake eyes. The celt left collapsed, bloodied Roman legions breaking through, rolling the line or charging into the reserve warband.

As the turn passed back the Carthaginians we counted up the broken units. An army is defeated once half of its units (not counting light cavalry or skirmishers) are broken. As it stood, the next army to lose a single unit would be defeated. With the celts on the left destroyed, it fell to the Spanish. They were engaged to their front again a Roman legion supported by the Cretan archers. Another Roman legion were attacking the Spanish flank.


We threw everything we could into the Spanish. The Libyans couldn't flank the Romans, and chasing the Cretan archers would do no good, so they stayed in support, adding their 3 dice to the Spanish. The celt slingers moved up to support the Spanish as well, giving them a grand total of 11 dice. We rolled... garbage. 1s and 2s and 3s. The Romans won the combat by a wide margin, forcing a break test at -5, which resulted in destruction for the Spanish.

Sigh.

What Did We Learn?


  • Testudo really is good against missile fire. I think the testudo should require an order to switch formations in order to charge, but the rules are explicit that testudos can do everything a normal Roman unit in battle formation can.
  • "Close Ranks" is great for blunting the initial warband charge.
  • Libyan spearmen are awesome at defending. I probably should have had them anchor my extreme flank. That 3 dice in support are also impressive. I need some more to get them into deep pike blocks.
  • Reserves are essential, not only for plugging gaps or defending flanks, but for applying pressure on weak parts of the enemy line. We haven't had enough units until now to make use of reserves but I expect that to change as I get more figures painted up.
  • Coordinating two divisions without using the "army general" to issue total commands is extremely tricky. Our line started to splinter right away as the two divisions rolled different numbers of moves.
I still really dig Hail Caesar, even when I lose. As we get a greater variety and number of figures on the table more interesting tactical options and challenges crop up. Looking forward to our next game!